Wednesday 28 February 2018

Extended Practice- Study Task 2 - Portfolio Building- YCN- Frontier- Research&Building the Set

Portfolio Building- YCN

- Frontier- Research & Building the Set

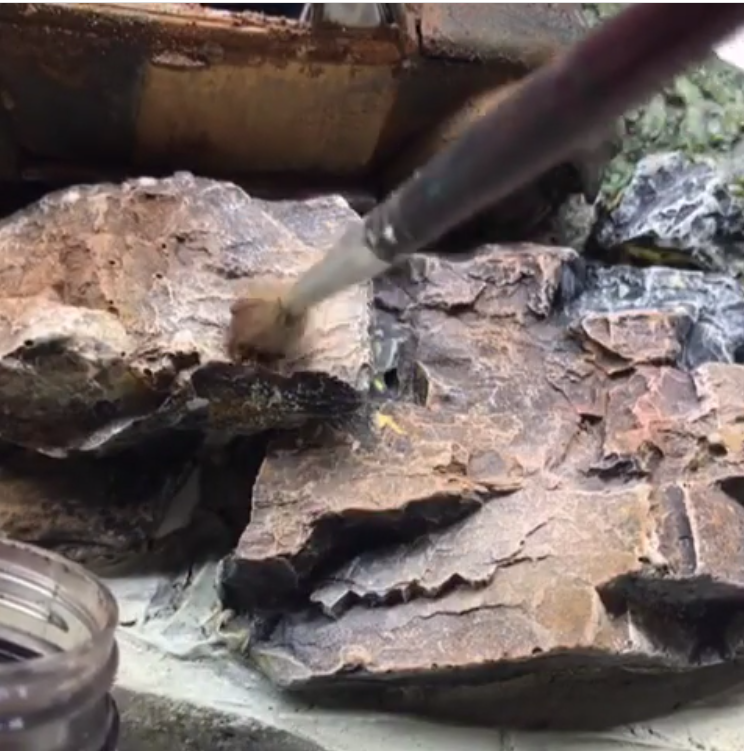
As the new idea was to have a rock climber on a cliff for the poster/ advertisement, the first thing I did as the set designer was to research how other people created the look. I wanted to experiment and see how a rock effect was achieved so this tended to lead me to train dioramas as they are very small but very detailed, so it was good to see their methods. Like dusting the rock after to create tones, as well as detail. This is something I will be trying to do, as well as looking at rock formations and what textures and shapes are created.


After looking at these rocks, I then found I was drawn more to canyon rock as the red colour really comes out and looks much more appealing than grey rock as that is much more common in the UK so wouldn't be as attractive, whereas the canyon rock makes us think of a more large adventure that would be in other destinations.

With these images, I was able to use them during construction to get the shapes and effects that natural rock creates. This is why I spent time getting these images together to all show how the rock could be shaped and how the colours of the rock could come out.


This is the beginning of the rock formation, i have chosen Polystyrene sheets as they are thick to carve into, as well as the character doesn't need to magnetise into it so I am able to make it more structurally sound. I glued different sheets together to get a large size so the puppet didn't need to be so small, as well as being able to get different structures on the same sheet for different shots.

I then began cutting down the pieces so they looked more natural and less like polystyrene. I found because of how flat the sheet was, a large bread knife did a really nice job of getting different cuts and rough effects from the sections. Below is a video of this process, showing how it is done and how much time it took to do the whole thing. This was also a very long process because glue soaks into the polystyrene, so drying was a nightmare as it took days.


Extended Practice- Study Task 2 - Portfolio Building- YCN- Frontier- Idea Change

Portfolio Building- YCN- 

Frontier- Idea Change

When thinking of ideas for Frontier, they look to have gone for an old style map so i thought of doing a pirate, something I have always wanted to build. This was why I went forward and designed a quick character, and lots of different shots we could do for a poster. 

Some from the front of the boat, some from the side, and some the back as this gave a full range of where the pirate could be and what could be going on around him. As these would all create an interesting overall look for the audience and show where he is stood clearly.
I was also looking at what could be going on in the sky and thought of how the website has a map background so it would be nice to mirror this is one of their campaigns so the audience knows who the poster is for as well as the logo.

After speaking to a tutor, this idea was quickly shot down. Which was hard to hear but would happen in the industry to I need to get used to it, yet was still hard to begin with. This was because it was set in the past, if it was in the present with people now, it might be more relatable and 'now'.

This was when different sports were suggested and I thought climbing would be the best as it is very different and like the Larger, would suggest people to try new things and go forward to look at life differently. So this seemed like an interesting thing to build also, we decided for my team mate to build the climber and I build the cliff face to show the climber already on the move and having an adventure. 


Extended Practice- Study Task 2 - Portfolio Building- Character Design Challenge- Alice In Wonderland-pt2

Portfolio Building-
Character Design Challenge- Alice In Wonderland

This is the beginning of the rabbit. Starting with a basic wire in the shape of the rabbit, I added sponge and glue to bulk out the sections and size needed, at this point it needed propping up as the head was outweighing the body so taping it down was needed.


 This is the more bulked out puppet where you can start to see the body shape desired.


 Here is the rabbit on a turning board to show the body, the string is being used to hold the sponge together so it doesn't spring apart before drying, so after drying it can be removed and leave behind the body shape that can be carved into more of a curve.
 This is the body after being carved. He now looks more like the rabbit and can be felted to beild up the white and pink colour.


This is the rabbit ready to be felted.
 This is the beginning of felting where you build up poking in felt to gain the tighness and colour needed for the rabbit. It takes a lot of time to do this stage as you have to stab in the felt for a long time to get it tight and to cover the yellow sponge so this is going to be lengthy but hopefully better than the last puppet.


This is the white felted version of the rabbit, I was able to add a tail to the back of him so he looks more like a rabbit too. This took a long time because felting takes a while to do anyways, but also becuase it was white covering yellow so he needed many layers.

He is starting to come together though but I dont know if I will get this puppet complete because the major brief is such a large undertaking.


Although I am not able to finish this character, you can see how he looks more like a teddy from him large arms to fuzzy ears. This is good for if the character were to be for a children's version on Alice in Wonderland as they would be drawn to the character.

I am sad I could not get this character completed but I will finish him in my own time as I would love to see how I could get him too look as the end result.

Tuesday 27 February 2018

Extended Practice- Study task 1- Extended Brief- Daughter's Character Design

Extended Brief- 

Daughter's Character Design

 These are the initial character designs of the daughter. This proved to be quite difficult as drawing a child is a new venture for me and he was very easy to make too creepy so I had to find the line between sweet and cute, before she looked too doll like and creepy.
This is a further page of designs when I found a face that was nice and sweet and not strange looking. I also did some expressions on the left as she is going to have replacement faces so these are the initial sketches of what faces she will pull. As she is a child, she is happy and bright, but notices her dads sadness so she will show concern on her face that will help show her personality and aid the performance.

This is the chosen design as the ponytail was popular in Victorian times, as well as being easier to animate with rather than hair all over the place as this will be knocked more. She also looks more sweet and innocent which is the idea with the daughter of the worried father.

Monday 26 February 2018

Extended Practice- Study Task 4 - Visual Journal- Presentation of Work for ArtBook

Visual Journal- 

Presentation of Work for ArtBook

This is the presentation for the ArtBook we are producing of PreProduction work. This is a lot more difficult for stop-motion as I will not have all of the furniture and props done by the March Date but I have been sketching the characters, logo designs, some furniture built and set/ environment designs to have within the book so this is still enough to produce the ArtBook but I would have loved to include everything possible, like the finished set ready for filming and the built characters with their turnarounds complete.

This gave me a good chance to see what peers thought of my work though and the feedback was very useful. One was to think of materials more for the characters as it is a long animation and they will be moving a lot, as well as producing more sketches and designs for the characters as at this point there weren't enough to see their size or personalities.